Print formatted text
The BLISS shell provides different way to print formatted text.
Note
Usage of styles is a manner to keep readable colors on dark and light terminals.
Print with HTML
The easiest way to print colors is to use print_html() with a HTML-like
formatting. It supports some common tags, and few others for colors.
Note
This print_html() function is available only in a Bliss shell.
Most colors are intented to be abstract in order to be picked according to the environement. Right now it is selected according to the dark/light mode of the background. But it could be selected according to the used style, the beamline or the session.
That is one of the recommended way to add colors, in order to provide a more consistent UI. This also can be tuned globally if needed.
Common tags
from bliss.shell.standard import print_html

print_html("""
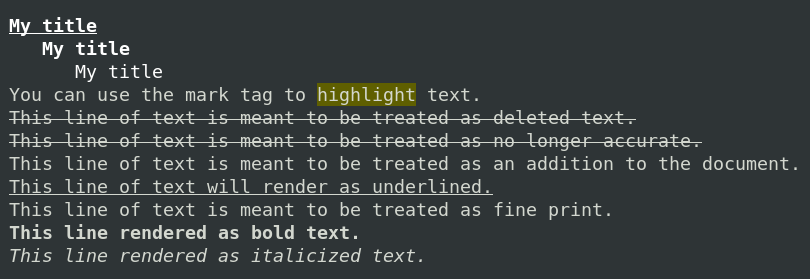
<h1>My title</h1>
   <h2>My title</h2>
      <h3>My title</h3>
You can use the mark tag to <mark>highlight</mark> text.
<del>This line of text is meant to be treated as deleted text.</del>
<s>This line of text is meant to be treated as no longer accurate.</s>
<ins>This line of text is meant to be treated as an addition to the document.</ins>
<u>This line of text will render as underlined.</u>
<small>This line of text is meant to be treated as fine print.</small>
<strong>This line rendered as bold text.</strong>
<em>This line rendered as italicized text.</em>
""")

Color palette tags
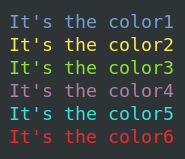
Few abstract colors are defined if you want to identify different elements. It’s a set of color from a consistent palette.
print_html("""
 <color1>It's the color1</color1>
 <color2>It's the color2</color2>
 <color3>It's the color3</color3>
 <color4>It's the color4</color4>
 <color5>It's the color5</color5>
 <color6>It's the color6</color6>
""")

For now this palette reuses the one defined for the standard terminal. But this could change in the future.
Warning tags
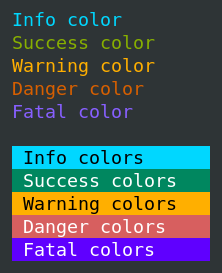
Some tags for warnings are also available. The name was reused from the Bootstrap library.
print_html("""
<info>Info color</info>
<success>Success color</success>
<warning>Warning color</warning>
<danger>Danger color</danger>
<fatal>Fatal color</fatal>

<bg-info> Info colors      </bg-info>
<bg-success> Success colors   </bg-success>
<bg-warning> Warning colors   </bg-warning>
<bg-danger> Danger colors    </bg-danger>
<bg-fatal> Fatal colors     </bg-fatal>
""")

Fixed color tags
Note
Fixed color tags are not recommended.
If needed, fixed colors can be used the following way.
# Colors from the ANSI palette.
print_html("<ansired>This is red</ansired>")
print_html("<ansigreen>This is green</ansigreen>")
# Named colors (256 color palette, or true color, depending on the output).
print_html("<skyblue>This is sky blue</skyblue>")
print_html("<seagreen>This is sea green</seagreen>")
print_html("<violet>This is violet</violet>")
Both foreground and background colors can also be specified setting the fg
and bg attributes of any HTML tag:
print_html("<aaa fg='ansiwhite' bg='ansigreen'>White on green</aaa>")
The color attributes can also be specified using hexadecial HTML color.
print_html("<aaa fg='#FF0000' bg='#404040'>Red on grey</aaa>")
Print with ANSI colors
Note
ANSI colors tags are not recommended.
A dedicated print is provided to display colors with ANSI sequence.
It can be used together with color helper.
It is mostly here for compatibility, and still have maybe use cases.
from bliss.shell.formatters.ansi import PURPLE, CYAN, DARKCYAN, BLUE, GREEN, YELLOW, RED, UNDERLINE, BOLD

print_ansi(RED("Abort !!!"))
PURPLE(msg)CYAN(msg)DARKCYAN(msg)BLUE(msg)GREEN(msg)YELLOW(msg)RED(msg)UNDERLINE(msg)BOLD(msg)
Tables
A common library to display table is tabulate. Unfortunatly it does not
support style.
A simplified version was designed to support styles.
It can be used the following way:
from bliss.shell.formatters import tabulate
print(tabulate.tabulate([
    [("class:header", "axis"), ("class:header", "position"), ("class:header", "unit")],
    [robx.name, ("class:warning", robx.position), robx.unit],
    [roby.name, ("class:color1", roby.position), roby.unit]
]))
Print refreshable text
You could want to display in the shell the content of something that can be updated or displayed until a manual abort.
We provide a text_block() helper for that.
It ansure to properly handle a user abort (CTRL-C) and that the display
will not be broken by other print or logging. For that every use of print()
or logging module will be displayed above this context.
Follow a processing
Here we change the displayed content between some processing.
with text_block() as tb:
    tb.set_text("Prepare processing")
    sleep(2)  # do stuff
    tb.set_text("Processing...")
    sleep(5)  # do stuff
    tb.set_text("Processing done")
Programatic rendering
Instead of explicitly tell what to display, a callback can be defined. This callback will be called everytime the block have to be redisplayed (commonly 3 times every seconds).
import time

start_time = time.time()

def render():
    # User function which returns height and content
    import time
    return 1, f" {time.time() - start_time:.2f} s"

with text_block(render):
    # wait forever
    while True:
        sleep(1)

Notice that it displays for you a toolbar to remember to use CTRL-C to abort.
In this case it raises a KeyboardInterrupt which can be captured by you
if you need.
Feedback on error
The next step to setup this TextBlockApplication is to
use a processing which have to be monitored.
For example you want to move a device and to monitor something until the motion is done.
robx.acceleration = 0.5  # let's slow down for the example

with text_block() as tb:
    step = "INIT"

    def render():
        nonlocal step
        return 1, f" {step} {robx.name}: {robx.position:0.2f} {robx.unit}"

    tb.set_render(render)
    try:
        # Init
        move(robx, 0, display_mode="no")
        # Do some stuffs
        step = "MOVE"
        move(robx, 5, display_mode="no")
        # Stabilisation
        step = "STAB"
        sleep(5.0)
    except BaseException:
        step = "ABORTED"
        raise
    step = "DONE"

If the user abort the task with CTRL-C, first the background task will be
cancelled, then the application will refresh the display, and finally the
KeyboardInterrupt will be raised. The displayed information will be
consistent.
Keyboard interaction
Small interaction with the keyboard can also be created the following way.
This could allow to create advanced helpers for users.
with text_block(key_bindings=["left", "right", "q"]) as tb:
    tb.set_text("Tweak (press q to quit, left/right to move roby)")
    while True:
        key = tb.wait_key_pressed()
        if key == "left":
            umvr(roby, -1)
        elif key == "right":
            umvr(roby, 1)
        else:
            break
Object info
The __info__ function can also be formatted with colors and styles.
There is 3 different ways to achieve that. Here is few examples:
from bliss.shell.formatters.ansi import RED
from prompt_toolkit.formatted_text import FormattedText, ANSI, HTML

class A:
    def __info__(self):
        # The most efficient way is to provide pre-parsed content
        return FormattedText([('', 'coucou'), ('class:danger', '!!!')])

class B:
    def __info__(self):
        # The HTML markup can be useful
        return HTML("coucou<danger>!!!</danger>")

class C:
    def __info__(self):
        # ANSI is not recommended, but still can be convinient for transition.
        # This only requires to wrap your old code with `ANSI`.
        return ANSI("coucou" + RED("!!!"))

Style customization
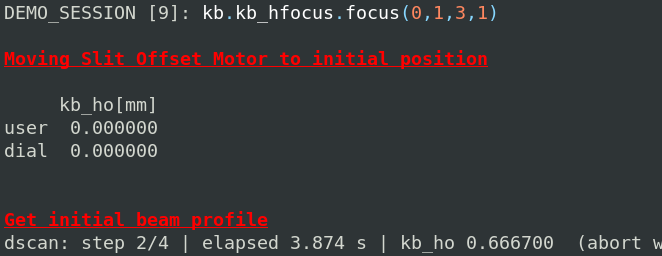
By default the title <h1> is white in a dark theme.
One could prefer to have a colorful title.
Here is an example to change colors in the session setup.
from bliss.shell.pt import default_style

default_style.DARK_STYLE["h1"] = "red underline bold"
Now, every script using <h1>, or getval.title() will use this custom style.
Example for kb focusing sequence:

See also: prompt_toolkit
documentation
for more information.
Another example for getval functions:
from bliss.shell.pt import default_style

# User input (default text).
default_style.SHARED_STYLE["getval"] = "white"

# Other classes
default_style.SHARED_STYLE["getval question"] = "orange bold"
default_style.SHARED_STYLE["getval prompt_char"] = "yellow"
default_style.SHARED_STYLE["getval valid_input"] = "red bold"
default_style.SHARED_STYLE["getval separator"] = ""
default_style.SHARED_STYLE["getval description"] = "blue"

Mostly the style classes follows this template:
[valid_input][separator][description]
[valid_input][separator][description]
[valid_input][separator][description]
[question][valid_input][prompt_char][]