Data policy and data format
The ESRF data policy allows users to access their data and electronic logbook at https://data.esrf.fr. The data is written in Nexus compliant HDF5 files in a specific directory structure.
Directory structure
Under the ESRF data policy the data directory is determined from: proposal name, sample name and dataset name. The data directory for a user experiment is:
/data/visitor/proposal/beamline/sample/sample_dataset/
Proposal
Change the proposal name with the command newproposal():
DEMO  [1]: newproposal("hg123")
Proposal set to 'hg123'
Data path: /data/visitor/hg123/idxy/sample/sample_0001
The root directory is determined from the proposal name (can be configured):
- user experiment: /data/visitor/proposal
- inhouse (starts with the beamline name): /data/idxy/inhouse/proposal/
- test (starts with test, temp or tmp): /data/idxy/tmp/proposal
When no proposal name is specified the default used is the beamline proposal name of the month (in this example February 2020 at beamline idxy).
DEMO  [3]: newproposal()
Proposal set to 'idxy2002'
Data path: /data/idxy/inhouse/idxy2002/idxy/sample/sample_0001
The default beamline proposal is also accessible through https://data.esrf.fr and offers an electronic logbook with the exception of test proposals.
At the end of an experiment you can use the function endproposal() to ensure nobody accidentally
adds data to the proposal directory from Bliss. Just like the command newproposal() it switches
data saving to the default beamline proposal of the month.
DEMO  [3]: endproposal()
Proposal set to 'idxy2002'
Data path: /data/idxy/inhouse/idxy2002/idxy/sample/sample_0001
Sample
Change sample name with the function newsample():
DEMO  [4]: newsample("treated_cells_1_4")
Sample set to 'treated_cells_1_4'
Data path: /data/visitor/hg123/idxy/treated_cells_1_4/treated_cells_1_4_0001
Dataset
Change the dataset name with the function newdataset():
DEMO  [5]: newdataset("area1")
Dataset set to 'area1'
Data path: /data/visitor/hg123/idxy/treated_cells_1_4/treated_cells_1_4_area1
When no dataset name is specified, datasets are numbered (unique within a sample):
DEMO  [6]: newdataset()
Dataset set to '0005'
Data path: /data/visitor/hg123/idxy/treated_cells_1_4/treated_cells_1_4_0005
Data structure
Within the directory of a dataset you can find the main Nexus compliant HDF5 file.
/data/visitor/proposal/beamline/sample/sample_dataset/sample_dataset.h5
All scan data belonging to the dataset are accessible through this one file, although some detectors (for example all 2D detectors) actually save their data in separate files.
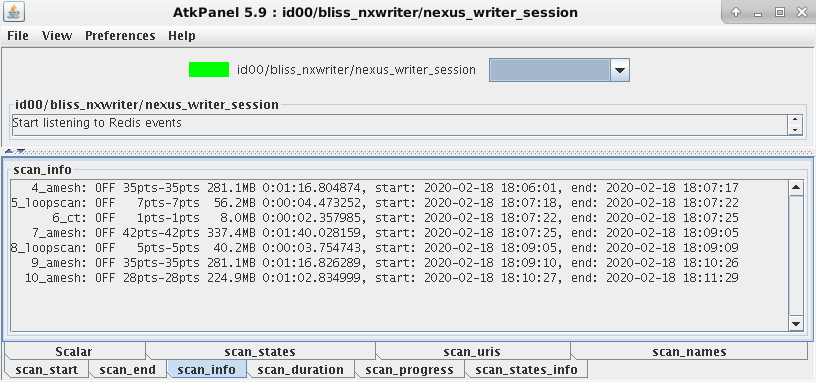
Data writing
A TANGO device referred to as the Nexus writer saves all data produced by BLISS. Data saving can be monitored through this device:
Accessing data
The ESRF Data Analysis Unit provids two main tools to visualize generic Nexus data:
- silx view
- pymca
A description on how to access HDF5 files, while they are being modified by a writer, can be found here.
Silx view
silx view sample_dataset.h5
Silx view can be called directly from a BLISS shell via silx_view()
function. It points then on the last scan’s data file.
Warning
Do not use a silx versions older than 0.12.0
BLISS locks the dataset file sample_dataset.h5 during scans. If other applications have locked the file (which is the default behaviour when opening HDF5 files) BLISS cannot write to it and scans will be prevented from starting. Tools like silx and pymca do not lock the file and are able to visualize its content without disturbing ongoing scans.
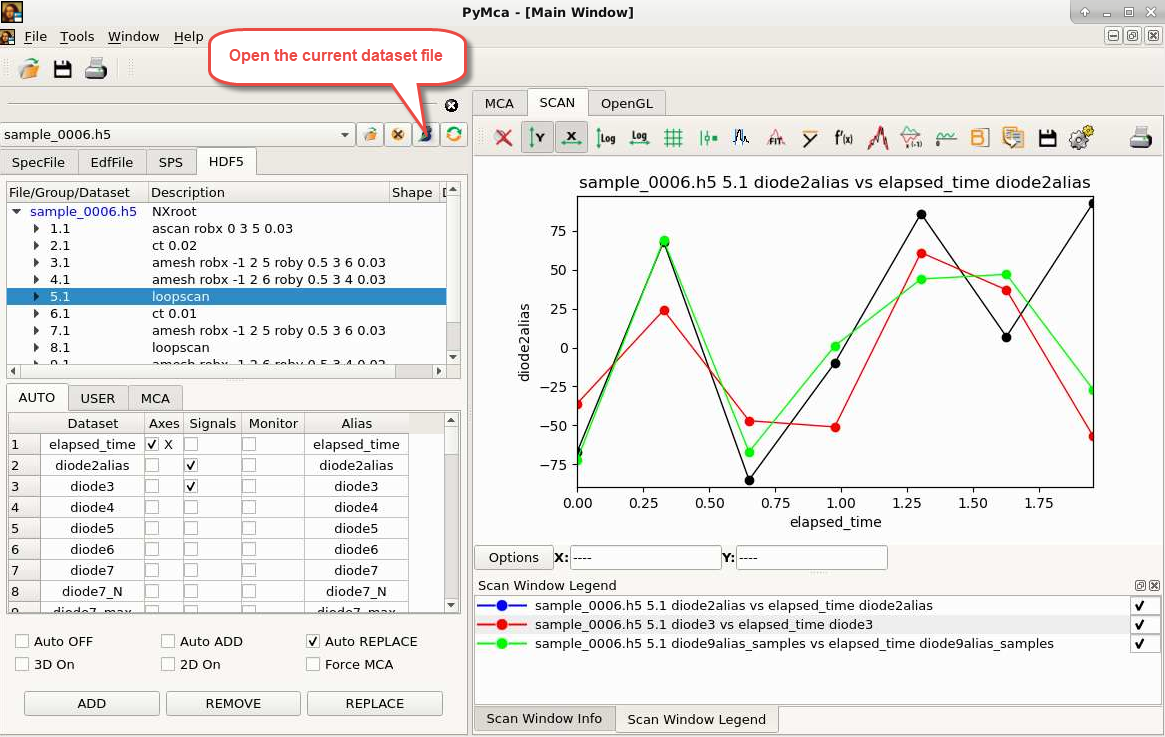
PyMca
pymca sample_dataset.h5
Provides easy access to positioner and detector data for plotting.
PyMca can be launched directly from a BLISS shell via the pymca() function. It
points then on the last scan’s data file.
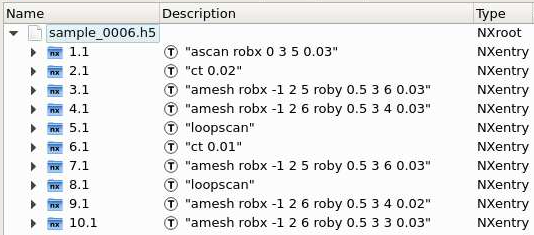
Nexus format
The dataset file sample_dataset.h5 contains one entry for each scan. Using the Silx viewer it looks like this:
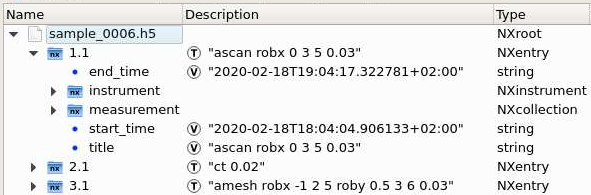
A scan entry has two subsections by default: instrument (for positioner and detector data/metadata) and measurement (links to all data under instrument). Additional subsections can appear when defining plots, scan notes, sample description and application definitions.
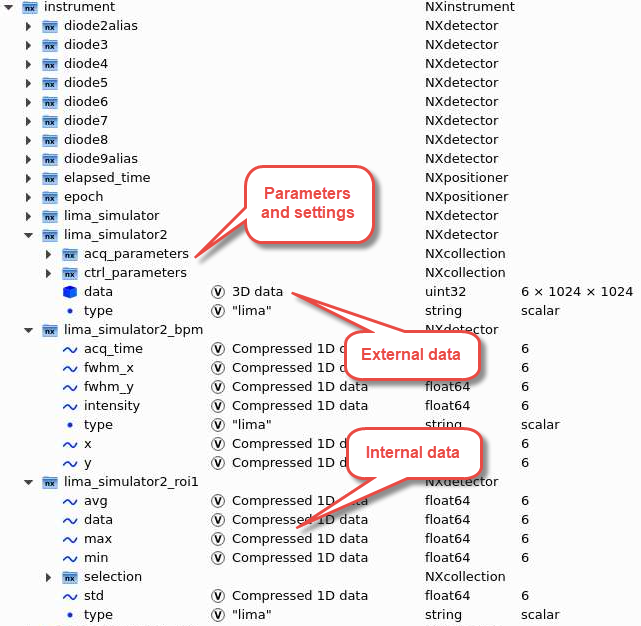
The instrument section contains groups of data and metadata for detectors and positioners:
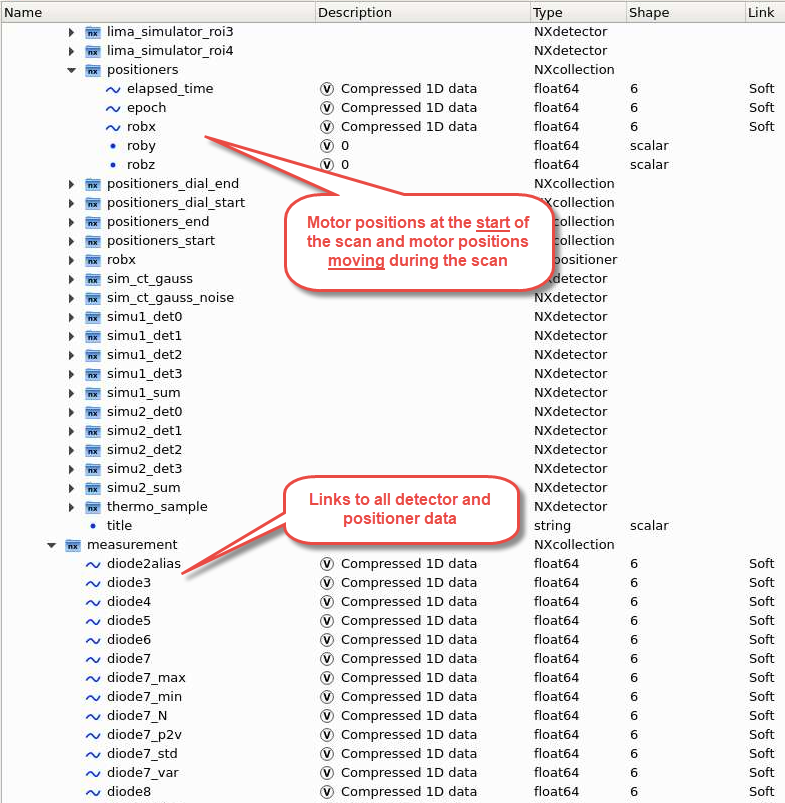
The measurement group together with the positioner group under instrument has all links to all data and motor positions at the start of a scan:
Custom metadata
BLISS provides metadata for detectors but if something is missing, there are two mechanisms to add custom metadata. The first is through user notes:
DEMO [1]: s = loopscan(10,0.1,run=False)
DEMO [2]: s.add_comment("This is a comment")
DEMO [3]: s.add_comment("This is another comment")
DEMO [4]: s.add_comment("And another one")
DEMO [5]: s.run()
The second is for more structured metadata can do this:
DEMO [1]: from bliss.scanning.scan_meta import get_user_scan_meta
DEMO [2]: scan_meta = get_user_scan_meta()
DEMO [3]: scan_meta.instrument.set("diffcam_distance", {"diffcam": {"distance": 10.2, "distance@units": "mm"}})
This adds an HDF5 dataset /<scan>/instrument/diffcam/distance with a units attribute to the
NXdetector group diffcam. The string "diffcam_distance" is not part of the metadata, it is just
an identifier to allow removing the metadata for the next scan.
DEMO [4]: scan_meta.instrument.remove("diffcam_distance")
Instead of a static dictionary, a function can be provided that returns a dictionary.
If it returns None or an empty dictionary it will be ignored. For example the sample-detector
distance could be derived from a motor position and you only want it for scans that have the detector
DEMO [1]: from bliss.scanning.scan_meta import get_user_scan_meta
DEMO [2]: scan_meta = get_user_scan_meta()
DEMO [3]: def diffcam_distance(scan):
            channels = scan.scan_info.get("channels", dict())
            diffcam_used = f"{diffcam}:image" in channels
            if diffcam_used:
                return {diffcam.name: {"distance": sy.position+10.2, "distance@units": sy.unit}}

DEMO [4]: scan_meta.instrument.set("diffcam_distance", diffcam_distance)
These commands need to be added to the session’s setup file for them to be persistent.
We used the instrument category in the examples above which adds metadata to the
/<scan>/instrument HDF5 group. You can add your own categories. For example to add the
/<scan>/sample/chemical_formula HDF5 dataset at the end of the scan
DEMO [1]: from bliss.scanning.scan_meta import get_user_scan_meta, META_TIMING
DEMO [2]: scan_meta = get_user_scan_meta()
DEMO [3]: scan_meta.add_categories({"sample"})
DEMO [4]: scan_meta.sample.timing = META_TIMING.END  # Default: META_TIMING.START
DEMO [5]: scan_meta.sample.set("chemical_formula", {"chemical_formula": "Fe2O3"})
Note that categories can have a timing for metadata to be generated at different stages
of the scan: start, prepared and end.
When adding metadata this way, consult the Nexus standard first to know whether the information you want to add already has a designated location and name.