Acquisition objects
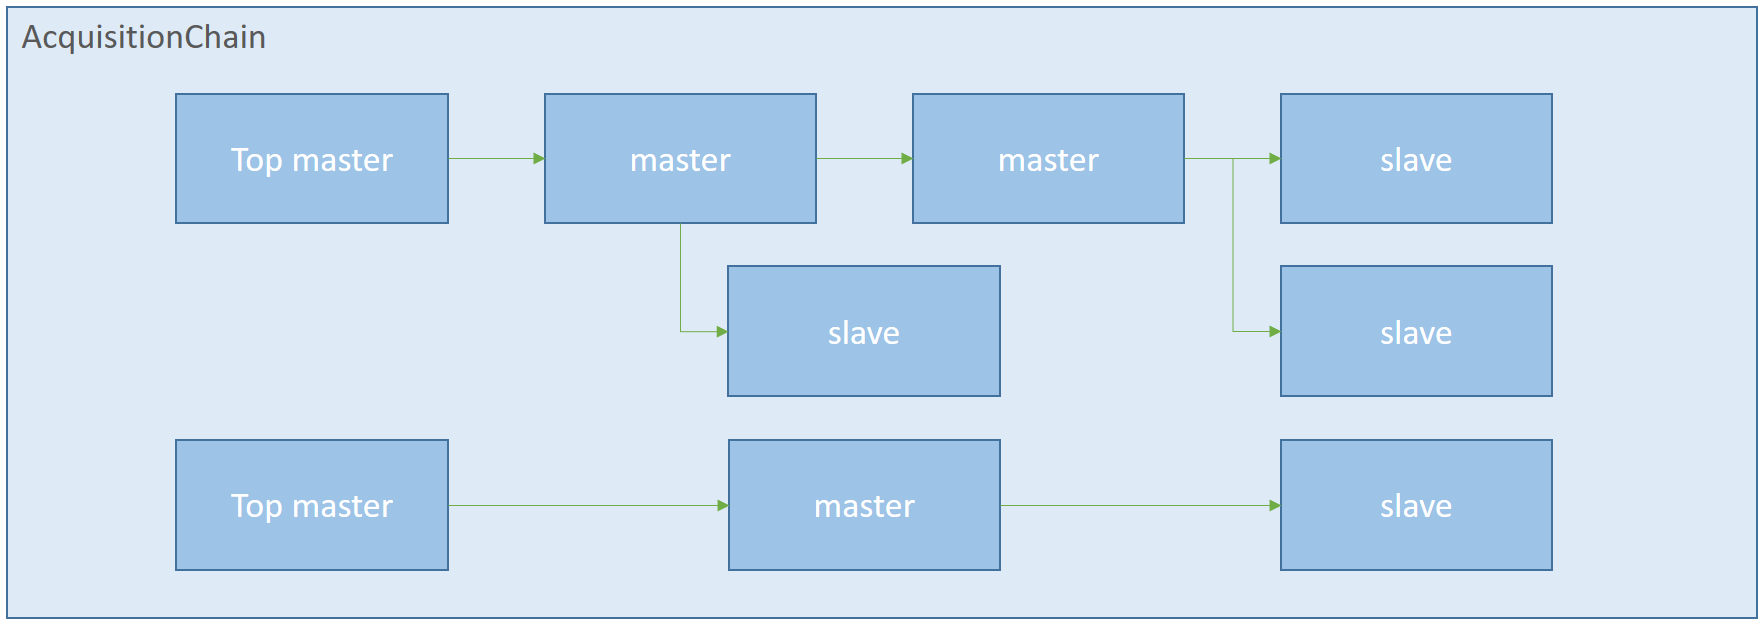
AcquisitionMaster and AcquisitionSlave objects are used to describe the triggering flow and data acquisition behavior of the different devices involved in a scan (axis, counters…). The relations between masters and slaves are described by the acquisition chain object.
AcquisitionSlave
The role of this object is to gather counters data and emit them to REDIS (see reading).
Regarding the acquisition chain tree, this object is always placed at the end of a branch of the chain (as a leaf).
In addition to the AcquisitionSlave base class, Bliss provides two standard objects which are commonly used by counter controllers:
AcquisitionMaster
The role of this object is to control the data acquisition behavior of its associated device
(see prepare, start, stop and AcquisitionMaster base class).
An AcquisitionMaster has the ability to call the trigger method of other acquisition
objects directly placed below himself in the chain (including other masters) (see trigger_slaves).
SoftwareTimerMaster
As a top-master it generates npoints software triggers, separated by the count_time period.
from bliss.scanning.acquisition.timer import SoftwareTimerMaster
master = SoftwareTimerMaster(cout_time, npoints, sleep_time=None, name='timer')
Motor masters
MotorMaster: basic scan of one motorSoftwarePositionTriggerMaster: triggers slaves at each stepJogMotorMaster: drives motor in velocityMeshStepTriggerMaster: for 2 to n dimensions meshLinearStepTriggerMaster: linear scan for n motors (aNscan)VariableStepTriggerMaster: generic master for arbitrary step by step acquisitionCalcAxisTrajectoryMaster: for trajectory capable motorsMeshTrajectoryMaster: for mesh using 2D trajectory-programmed controllersSweepMotorMaster: to deal with high dead time detectors
The exhaustive list of motor master objects is available in
bliss.scanning.acquisition.motor
MotorMaster
from bliss.scanning.acquisition.motor import MotorMaster
master = MotorMaster(axis, # axis to drive
                     start,
                     end,
                     time=0,
                     undershoot=None, # leave it to None to let it calculated
                     undershoot_start_margin=0,
                     undershoot_end_margin=0,
                     backnforth=False)
-
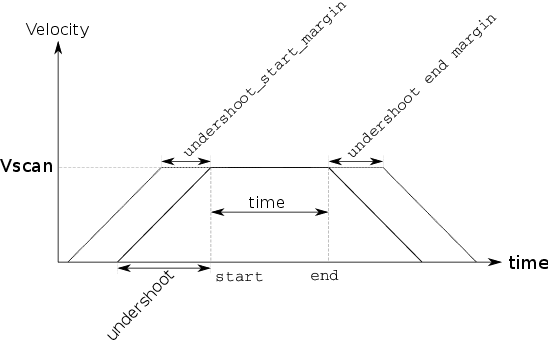
Drives one motor from a
startposition to aendposition at a constant speed. -
If
undershootis None, it is calculated according to the acceleration of the motor. -
undershoot_start_marginandundershoot_end_margincan be added to the calculated undershoot. -
backnforthoption will do every even motions in one direction and odd motions in the other direction. This is useful to optimize mapping scans.
SoftwarePositionTriggerMaster
- Drives the axis the same way as the
MotorMaster. - Sends a software trigger to slaves for each step position between start position and end position
from bliss.scanning.acquisition.motor import SoftwarePositionTriggerMaster
master = SoftwarePositionTriggerMaster(
      axis,
      start,
      end,
      npoints=1, #number of trigger between start and end position
      time=0,
      undershoot=None, # leave it to None to let it calculated
      undershoot_start_margin=0,
      undershoot_end_margin=0,
      backnforth=False)
JogMotorMaster
Some motor controller must be driven in speed instead of position to reach
the top speed. JogMotorMaster helper will calculate the undershoot needed
to reach the jog_speed at the start position.
To deal with margins, position value has to be added or subtracted to the start position.
jog_speedis sign to control the rotation clockwise or counterclockwise.- To end the movement:
- either the axis is externally stopped
- or a
end_jog_function()function may be provided. it will be called during the motion. The return of this function will end the movement if it does not returnTrue.
from bliss.scanning.acquisition.motor import JogMotorMaster

def end_jog_function(axis):
    """
    This function will ends the movement if returns != True.
    """
    return axis.position < 720.

master = JogMotorMaster(axis,
                        start,
                        jog_speed,
                        end_jog_function=end_jog_function)
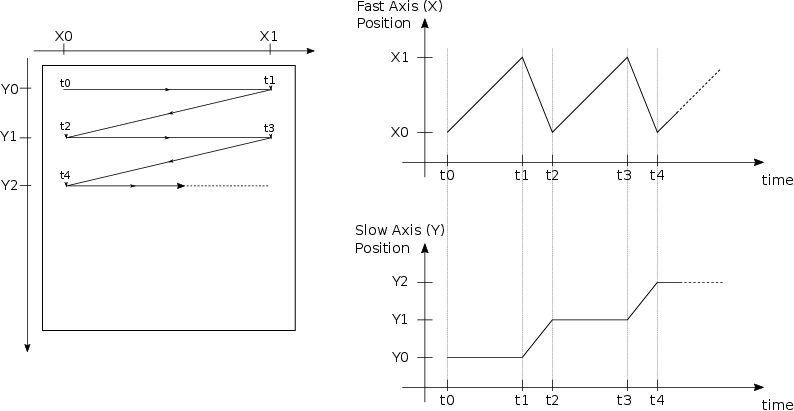
MeshStepTriggerMaster
Control from 2 to n motors to drive them during a mesh step scan. This master will build a position grid for all axis.
Arguments passed to this object is a list of:
axis, start_position, end_position, nb_points.
A 2D mesh can be written as follow:
from bliss.scanning.acquisition.motor import MeshStepTriggerMaster
master = MeshStepTriggerMaster(axis1,  0, 1, 5,  # fast axis
                               axis2, -1, 1, 10) # slowaxis
In this example axis1 will be the fast axis => it will move on any
step.
axis2 will be move every 5 steps.
In short, axis1 is the columns axis and axis2 is the lines axis.
for a 3D mesh:
from bliss.scanning.acquisition.motor import MeshStepTriggerMaster
master = MeshStepTriggerMaster(axis1,  0, 1, 5,  # fast axis
                               axis2, -1, 1, 10,
                               axis3, -2, 2, 20) # slowest axis
backnforth can be activated to do a snake style mesh. i.e: in a case of 2D mesh odd lines are scanned in one direction and even are scanned in the other direction.
LinearStepTriggerMaster
Drive axis across a n dimensional line like anscan command. Argument of the master are:
- first argument the number of points
- then a triplet with axis instance follow by the start position and the end position
To drive two axis here is an example:
from bliss.scanning.acquisition.motor import LinearStepTriggerMaster
nb_points = 20
master = LinearStepTriggerMaster(nb_points,
                                 axis1,0,10,
                                 axis2,-1,1)
VariableStepTriggerMaster
Generic motor master for arbitrary step by step acquisition. Positions are provided via a iterable object like list, numpy array… Argument for this master is a couple of axis followed by an iterable position object.
Note
All motors should have the same amount of positions.
Here is a example to do a arc scan of 90 points from -45 deg to 45 deg with rayon of 5 with first axis X and second axis Y.
import numpy
from bliss.scanning.acquisition.motor import VariableStepTriggerMaster
rayon = 5
angles = numpy.linspace(-45,45,90)
x_positions = rayon * numpy.cos(numpy.deg2rad(angles))
y_positions = rayon * numpy.sin(numpy.deg2rad(angles))
master = VariableStepTriggerMaster(X, x_positions,
                                   Y, y_positions)
CalcAxisTrajectoryMaster
When real axis of a calculation axis have a motor controller with trajectory
capable, it can be used to automatically calculate trajectory of real motors. It
has the same behavior of the MotorMaster but on a calculation axis => constant
speed on the calculation axis.
from bliss.scanning.acquisition.motor import CalcAxisTrajectoryMaster
master = CalcAxisTrajectoryMaster(calc_axis,
                                  start, #start position
                                  end, #end position
                                  nb_points, # nb sampling point for trajectory
                                  time_per_point)
Warning
nb_points define the sampling for the final trajectory. This will determine it’s precision. It will be the number of points loaded into the motor controller.
MeshTrajectoryMaster
This master control 2 axis to program a mesh trajectory on a motor controller capabale.
from bliss.scanning.acquisition.motor import MeshTrajectoryMaster
master = MeshTrajectoryMaster(
   X,     # axis instance for colums
   X0,    # first column position
   Xend,  # last column position
   nb_columns, # number of point on column
   Y,    #axis instance for lines
   Y0,   # first line position
   Yend, # last line position
   time_per_point,
   undershoot = None,  # if None calculate it with the axes acceleration
   undershoot_start_margin=0, # margin before 1st column position for each line
   undershoot_end_margin=0    # margin at the end of each line)
Note
undershoot, undershoot_start_margin and undershoot_end_margin are
for each line of the mesh. Same meaning as MotorMaster
variables.
SweepMotorMaster
Main usage of this master is to deal with a camera with a high dead
time. This dead time prevents to acquire images during only one
motion (like MotorMaster) because the gaps between images are to
high. This master splits a continous motion into several, basically one
motion per image. Final motion looks like:
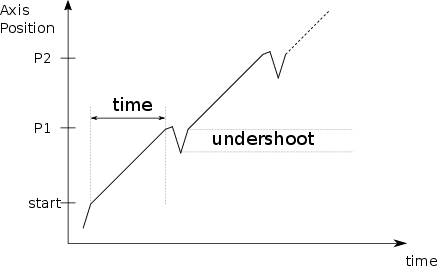
One the first iteration, the motion is at constant speed between
start position and P1, then the second iteration rewind the axis
and restart an other motion and reach the constant between P1 and
P2… and so one until end position. The number of movement is
defined by the npoints. time defines the elapsed time between points.
from bliss.scanning.acquisition.motor import SweepMotorMaster
master = SweepMotorMaster(
    axis,  # axis instance
    start, # first point position
    end,   # last point position
    npoints=1, # number of points (images)
    time=0,    # see above schema
    undershoot=None, # if None calculated with axis acceleration
    undershoot_start_margin=0,
    undershoot_end_margin=0)
Note
undershoot, undershoot_start_margin and undershoot_end_margin are
for each point (images). Same meaning as MotorMaster
variables.